

VDASH Guide
Volvo P3 TFT DIM Retrofit
How to retrofit the newer TFT instrument cluster into supported Volvo P3 cars using VDASH.
TFT DIM retrofit
Overview
All older P3 platforms are equipped with the older version of the instrument cluster (DIM).
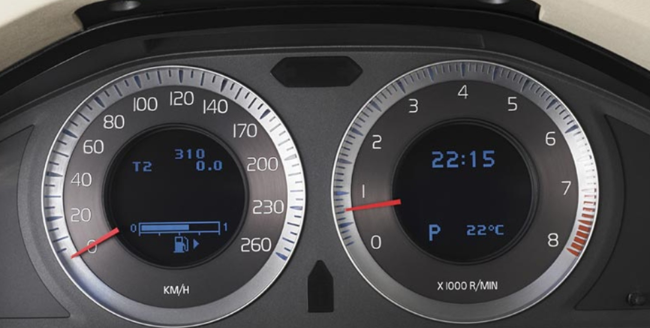 or
or 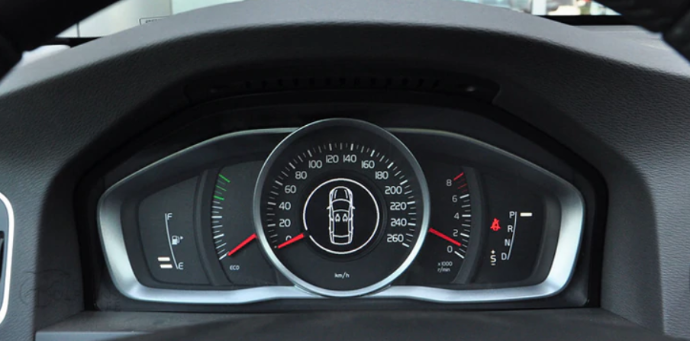
These vehicles can be modernized and equipped with much more modern and stylish TFT clocks, which have been installed in series since 2014:
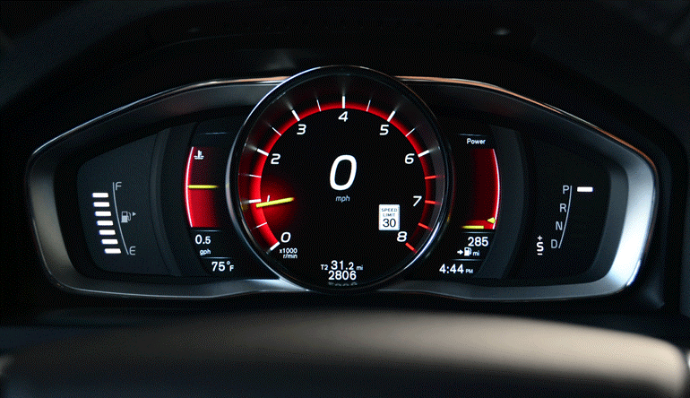
Videos
Here you can watch a couple of videos which will definitely come in handy.
Introduction: https://www.youtube.com/watch?v=p47tuB9B--c
Video how-to: https://www.youtube.com/watch?v=nX03RHOQxNQ
Before you begin the retrofit, please read the manual carefully. Look out for commonly known mistakes and restrictions at the end of this article.
You will need
- T25 Torx screwdriver
- A flat screwdriver or an equivalent tool
- A computer with Windows 7 or newer + installed .NET Framework 4.x
- VDASH 2.0 (you can download it here: https://www.d5t5.com/sw/vdash.exe)
- A car charger (10–15A)
- A stable internet connection
- Used TFT DIM clocks from S/V60, XC60, S80II, XC/V70III made between 2014 and 2017 (the unit from the V40 series can only be used in V40 cars — it has a different mechanical shape than x60, x70, and x80)
- Make sure that you have located a TFT DIM that matches the transmission type of the target car — automatic (PRND display) or manual (+ Gear -) on the right side of the display. The diesel/petrol fuel type of the donor car does NOT matter.
- The following items will only be used for model years up to and including 2013:
- A twisted pair of cables (1m)
- 2pcs original Volvo terminals for repair (P/N 30656697) or 2 used terminals from a white DIM Volvo connector, which is standard for all Volvos starting from 2005
- 2pcs UB2A Scotchlok from 3M
- A universal multimeter
Preparation
- Install VDASH on your computer and register your account.
- Connect a charger to the battery of the vehicle.
- Temporarily disconnect the horn power supply (15A - XC60: fuse 29, other models: TBD).
- Connect DiCE/J2534 to the OBD port and make sure the green LED light is flashing. Then connect the USB cable.
- Turn the ignition key to position II (press the Start/Stop button and hold it for 3 seconds without pressing the brake pedal).
- Open VDASH 2.0 and sign in with your account. Wait a few seconds for VDASH to detect your vehicle.
- Then press DECODE CEM. We must warn you that this process can take up to 24 hours (but on average it usually does not take more than 12 hours). During the whole process, you can interrupt the decoding process and continue later. If you do the CEM PIN decoding, then you no longer need to do it again. Thanks to this, you can also make other changes in the vehicle configuration, including the TFT retrofit. After this process is done, you will receive an email to the account you used at the beginning.
- After you have finished this, make the payment using the cash icon. We accept credit cards and PayPal.
- Then click the “Connect” button (with VIN), and you will be able to see the home screen.
- Then choose CAR CONFIGURATION and then “Car configuration wizard”. Then you only need to choose the “TFT retrofit” wizard. Make sure DIM is connected.
- The wizard will start running, VDASH will make a backup of the DIM, and will let you know once the process is over.
- If you forgot to decode the CEM PIN, VDASH will immediately remind you and will continue decoding the PIN if it is still not done yet. This can also take up to 24 hours, which is why you need to have your car and your computer plugged in.
DIM replacement
- Turn the ignition off and you can start switching the clocks — to avoid a blown fuse, disconnect the car battery.
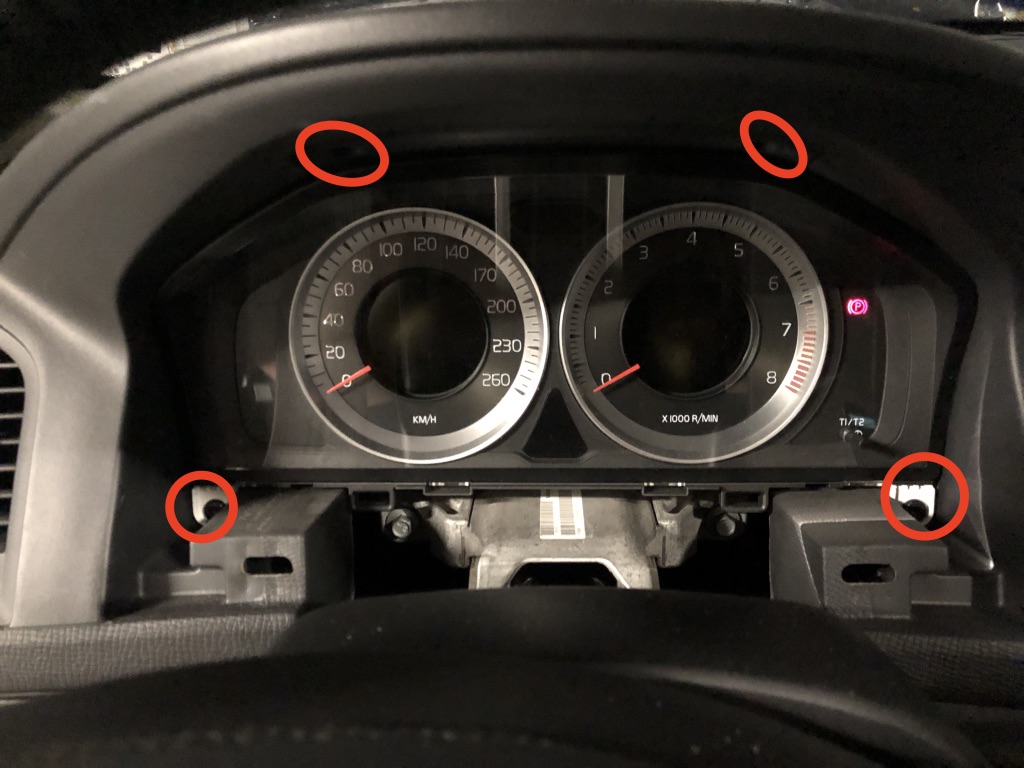
- For easier handling, put the steering wheel in the lowest position possible, remove the cover under the clocks, and unscrew the 4 T25 Torx screws shown in this picture.
- Place a non-sharp object between the clocks and the dashboard, preferably made of plastic, then release the clip and pull the clocks out, facing you.
- Unplug the connector on the left rear side (MY14 and newer cars do have the wiring from the factory, skip the wiring section).
Wiring section
- Unplug the small blue “thingy” using a thin screwdriver.
- 2 new repair wires (Volvo P/N 30656697 or used) must be connected to position 7 and 8 in the white DIM connector. Keep plugging the wires into the “body” of the connector until you can hear them click properly. Then place and click the blue thingy back into its place. If the wires do not sit properly, the blue thingy will not click in.
- Unplug the OBD connector (depending on your vehicle, it can be held by 1 or 2 T25 Torx screws).
- Then plug in a new twisted pair of wires: DIM pin 7 - OBD pin 6 (blue and black), DIM pin 8 - OBD pin 14 (green and black wire):
- DIM pin 7 <---> OBD pin 6 (blue-black wire)
- DIM pin 8 <---> OBD pin 14 (green-black wire)
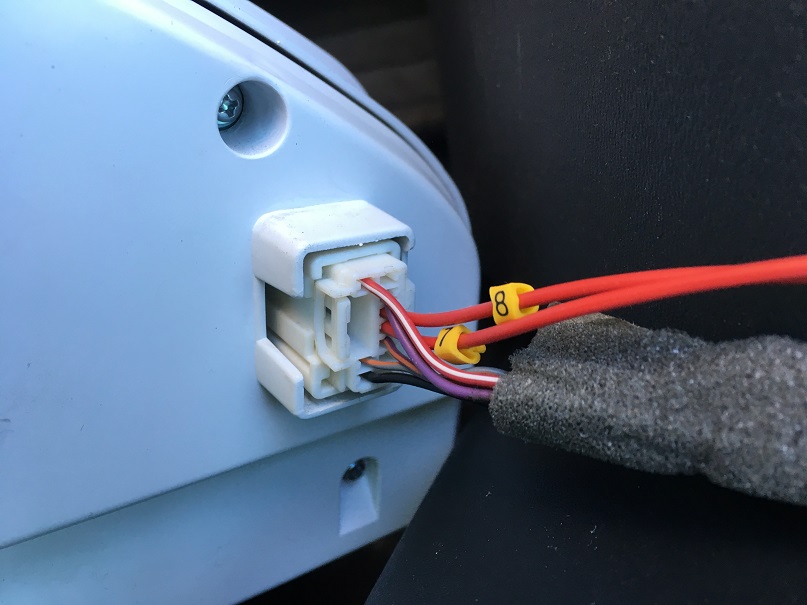
Use the 3M UB2A Scotchlok to connect the new wires to the already existing OBD wires. Do not use cheap Scotchlok connectors, as they are not high quality. An alternative could be to slowly and carefully solder the wires.
Finish the retrofit in VDASH
- Connect DiCE again, turn the ignition key to position II, and open VDASH again on your computer. Go to “Car configuration wizard” and choose TFT retrofit again.
- VDASH will begin to look for the newly connected TFT DIM. If all wires are correctly plugged in, the update process will begin. If not, then check the connection of the wires again using the multimeter.
- Your vehicle will restart itself many times during the process, and at the end you will see a picture of the vehicle, the fuel level, and more. At the very beginning, incorrect values can be displayed, but after a short test drive, it should be fixed. The kilometres will also automatically reappear.
- In this step, you can change the language using the DIM box: first set Set DIM language > By PID (choose language below), then choose your language in the Set DIM language by PID menu. You can also change the Lane Departure Warning (LDW) volume.
- Delete the service interval using Clear SRI (only in case of an unsuccessful conversion).
- Set DIM Time if the time is not set correctly.
- Erase error codes using Clear DTCs.
- Connect the horn power supply.
- Finish the installation of the TFT DIM by covering and plugging in the OBD connector (4pcs T25 Torx).
- The last step is a test drive, during which you must observe the fuel level, then double-check everything again.
Clock themes
You can change and move the clock themes only when the engine is running (this does not have any specific explanation). The designated theme is Elegance (grey or brown). It is possible to reprogram this theme to the blue “R-design” version (using Car configuration > Advanced settings > Advanced TFT DIM settings > Screen Skins > DIM: R-design menu). The Eco and Power themes remain unchanged.
Known issues and limitations
The old type TFT DIM (with white back cover) cannot be retrofitted to VEA engines. Use only the late TFT with the black back cover.
- Non-Sensus vehicles (S80, V/XC70III, XC60 to MY11)
- Eco/Power indicators do not work or do not show correct values (ECM does not provide them)
- DSTC (ESC) cannot be turned OFF
- Shifting indicators +/- may not be working with the manual gearbox
- Clock can only be set in VDASH (during a time change or after unplugging the battery) or VDD
- The service interval can only be reset in VDASH or VDD
- Sensus cars (S60/V60 MY11-MY13, S80, V/XC70III, XC60 - MY12-MY13)
- Eco/Power indicators do not work or do not show correct values (ECM does not provide them)
- DSTC (ESC) cannot be turned off (ICM will show the value, but it cannot be changed)
- Shifting indicators +/- may not be working with the manual gearbox
- Clock can only be set in VDASH (during a time change or after unplugging the battery) or VDD
- The service interval can only be reset in VDASH or VDD
- The oldest P3 cars (S80 MY07) need an additional step to get rid of the “Steering lock service required” DIM message:
1. Temporarily disconnect the newly connected cables from the white DIM connector, and connect the original DIM
2. Start the engine (SCL, the steering lock, will now unlock)
3. While the engine is running, disconnect the original DIM connector and reconnect the additional wiring, then connect the TFT DIM
4. Turn the engine off and lock the car
5. SCL will NOT turn on again (unless you connect the original DIM). You will not observe any further immobilization issues.
Credits: Jamie Chen, Peter Jonsson